
We can run a batch of tests by creating a testng.xml configuration XML file and Running it using the TestNG. And also we can generate graphical test reports by running it.
Before creating a testng.xml configuration XML file, first lets create tests by following the below steps:
1. Create a new Project say 'RC-Project67' in Eclipse IDE
2. Configure the Project to work with Selenium RC
3. Configure the Selenium Standalone Server to run from Eclipse IDE
4. Create a package say 'package67' under the newly created project.
5. Create a Java Class files say 'ChapterOneTests', 'ChapterTwoTests', 'ChapterThreeTests' under the newly created package as shown below:

6. Lets write the tests on 'Chapter1' page of 'http://book.theautomatedtester.co.uk/' web application as shown below:

7. The Java Class file 'ChapterOneTests.java' will look as shown in the below screenshot after writing the Selenium RC automation code for the tests explained in the above step.

8. Lets write the tests on 'Chapter2' page of 'http://book.theautomatedtester.co.uk/' web application as shown below:

9. The Java Class file 'ChapterTwoTests.java' will look as shown in the below screenshot after writing the Selenium RC automation code for the tests explained in the above step.

10. Lets write the tests on 'Chapter3' page of 'http://book.theautomatedtester.co.uk/' web application as shown below:

11. The Java Class file 'ChapterThreeTests.java' will look as shown in the below screenshot after writing the Selenium RC automation code for the tests explained in the above step.

12. Save all the Java Class files 'ChapterOneTests', 'ChapterTwoTests', 'ChapterThreeTests' by click on the 'Save All' option on Eclipse IDE as shown below:

13. Start the Selenium Standalone Server
14. Right click on the 'ChapterOneTests' Java Class file and select to Run as 'TestNG' as shown below:

15. Ensure that our tests in 'ChapterOneTests' Java Class file got passed as shown below:

16. Right click on the 'ChapterTwoTests' Java Class file and select to Run as 'TestNG' as shown below:

17. Ensure that our tests in 'ChapterTwoTests' Java Class file got passed as shown below:

18. Right click on the 'ChapterThreeTests' Java Class file and select to Run as 'TestNG' as shown below:

17. Ensure that our tests in 'ChapterThreeTests' Java Class file got passed as shown below:

Now lets create a testng.xml configuration XML file for batch running all the tests in the Java Class files 'ChapterOneTests', 'ChapterTwoTests' and 'ChapterThreeTests' by following the below steps:
1. Right click on your computer and select 'New' -> 'Text document' option as shown below:

2. Open the created Text Document as shown below:

3. Open http://testng.org/doc/documentation-main.html#testng-xml page and copy the code as shown below:

4. Paste the copied code into the Text Document opened in step 2 as shown below:

5. Change the suite name to 'TheAutomatedTester' for now as shown below: (You can give any suite name based on the context you are running your tests)

6. As we have three Java class files in our Project, suppose you want to execute 2 Java class files as one test and another Java class files as another test. Make sure that you have two <test> tags, i.e. one test tag with only one class file and the another with two class files as shown below:

7. Change the test names to 'TestOne' and 'TestTwo' as shown below: ( Assume that the TestOne and TestTwo are Test Categories under which you have categorized your tests. You can categorize your tests according to your application functionality or you can distribute the number of class files across the Test Categories. Its your wish :) )

8. Now change the class name of the first <class> tag by providing the parentpackagename.subpackagename.classfilename. In our case we don't have sub package, hence it will be packagename.classfilename. Hence we have to change the class name of first <class> tag in testng.xml configuration file to package67.ChapterOneTests as shown below:

9. In the similar way, change the class names of remaining two <class> tags as shown below:

10. Click on 'File' menu and select 'Save As' option as shown below:

11. Ensure that the Save As dialog is displayed as shown below and give the File Name as testng.xml and Save as type field value as All Files and click on 'Save' Button

12. Ensure that testng.xml file got created on your computer as shown below:

13. In Eclipse IDE, create a folder 'Config' as shown below:

14. Copy the testng.xml file on your computer as shown below:

15. Paste the copied testng.xml file into the Config folder in Eclipse IDE as shown below:

16. Ensure that the testng.xml file got copied into the Config folder as shown below:

Now lets run the testng.xml configuration file using TestNG, in order to run all the Java Class files that we have mentioned in the files by following the below steps:
1. Start the Selenium Standalone Server
2. Right click on the testng.xml file and select to Run as 'TestNG Suite' as shown below:

3. Observe that all the Test methods inside the Java Class files which we have specified in the testng.xml config file got passed as shown below:

4. Observe that 'test-output' folder is not displayed in the Project as shown below:

5. Right click on the Project and select 'Refresh' option to refresh the project as shown below:

6. On Refresh, observe that the 'test-output' folder is displayed as shown below:

7. Expand the 'test-output' folder and ensure that 'index.html' file is displayed as shown below:

8. Right click on the 'index.html' file and select to open with web browser as shown below:

9. Observe that the TestNG test results graphical report is displayed as shown below:

Observe that this report is not as per our needs. We have to customize this report by editing its html code and generate a report that meets our needs. How to customize this report will be explained when the time comes.
Watch the Below Video:
Click Here to watch the Video
Download this Project:
Click here to download this project and import into Eclipse IDE on your machine.
Please comment below to feedback or ask questions.
Understanding the usage of verbose attribute in testng configuration file will be explained in the next post.


2. Open the created Text Document as shown below:

3. Open http://testng.org/doc/documentation-main.html#testng-xml page and copy the code as shown below:
4. Paste the copied code into the Text Document opened in step 2 as shown below:
5. Change the suite name to 'TheAutomatedTester' for now as shown below: (You can give any suite name based on the context you are running your tests)
6. As we have three Java class files in our Project, suppose you want to execute 2 Java class files as one test and another Java class files as another test. Make sure that you have two <test> tags, i.e. one test tag with only one class file and the another with two class files as shown below:
7. Change the test names to 'TestOne' and 'TestTwo' as shown below: ( Assume that the TestOne and TestTwo are Test Categories under which you have categorized your tests. You can categorize your tests according to your application functionality or you can distribute the number of class files across the Test Categories. Its your wish :) )
8. Now change the class name of the first <class> tag by providing the parentpackagename.subpackagename.classfilename. In our case we don't have sub package, hence it will be packagename.classfilename. Hence we have to change the class name of first <class> tag in testng.xml configuration file to package67.ChapterOneTests as shown below:
9. In the similar way, change the class names of remaining two <class> tags as shown below:
10. Click on 'File' menu and select 'Save As' option as shown below:
11. Ensure that the Save As dialog is displayed as shown below and give the File Name as testng.xml and Save as type field value as All Files and click on 'Save' Button
12. Ensure that testng.xml file got created on your computer as shown below:
13. In Eclipse IDE, create a folder 'Config' as shown below:
14. Copy the testng.xml file on your computer as shown below:

15. Paste the copied testng.xml file into the Config folder in Eclipse IDE as shown below:

16. Ensure that the testng.xml file got copied into the Config folder as shown below:
Now lets run the testng.xml configuration file using TestNG, in order to run all the Java Class files that we have mentioned in the files by following the below steps:
1. Start the Selenium Standalone Server
2. Right click on the testng.xml file and select to Run as 'TestNG Suite' as shown below:

3. Observe that all the Test methods inside the Java Class files which we have specified in the testng.xml config file got passed as shown below:
4. Observe that 'test-output' folder is not displayed in the Project as shown below:

5. Right click on the Project and select 'Refresh' option to refresh the project as shown below:

6. On Refresh, observe that the 'test-output' folder is displayed as shown below:
7. Expand the 'test-output' folder and ensure that 'index.html' file is displayed as shown below:
8. Right click on the 'index.html' file and select to open with web browser as shown below:
9. Observe that the TestNG test results graphical report is displayed as shown below:
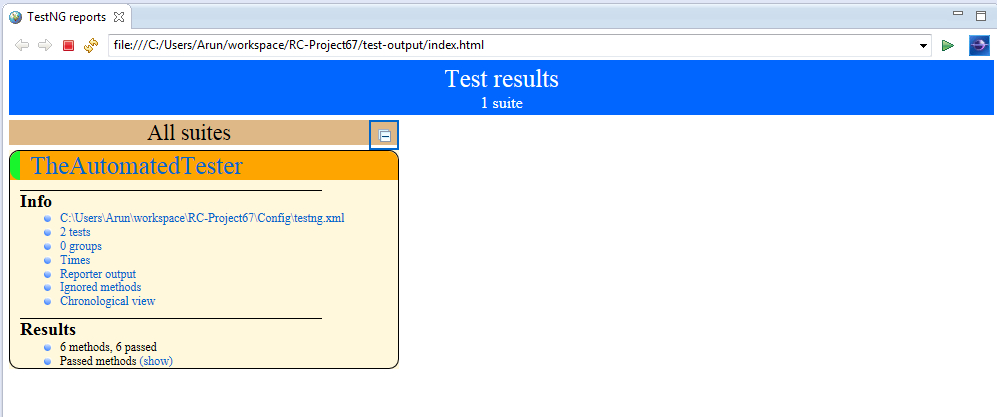
Observe that this report is not as per our needs. We have to customize this report by editing its html code and generate a report that meets our needs. How to customize this report will be explained when the time comes.
Watch the Below Video:
Click Here to watch the Video
Download this Project:
Click here to download this project and import into Eclipse IDE on your machine.
Please comment below to feedback or ask questions.
Understanding the usage of verbose attribute in testng configuration file will be explained in the next post.
Am using selenium webdriver (ANT+TestNG+Java).How do I save results of TestNG with time-stamp and build no.(testng-results-Build no:DD-MM-YYYY_HH-MM-SS.xml),without overwriting previous results. Could anyone share the build.xml code?
ReplyDeletegreat...will refer your blog in my blog...
ReplyDeleteThanks a lot, this is very helpful. Many thanks for step by step clear instructions with screenshots.
ReplyDeleteThanks a lot :) Great work
ReplyDeleteThank you for the detailed steps! Helped a lot :)
ReplyDelete